Today, my sister Tess brought down the project to get started. She towed it behind her land yacht (Suburban) and we met at Fillmore, which is the original capitol of Utah. Eventually, the Utah government thought that the best place for the capitol would be the center of the state, but eventually they figured it was a long horse ride from Salt Lake City to the capitol, so they moved the capitol north to SLC. Smooth move, since 90% of the population and business growth was in SLC.
This was actually my first chance to view the "project". I am very pleased with the unit. It is very pristine for a used unit. Probably, because it has been wrapped up since it was first purchased. On the way back, I took a picture of it.

So, here is the "project". It is a 5x8 cargo trailer, which I am planning on converting to a small, lightweight back roads camper. It is a 2007 Wells Cargo V Force Cargo Trailer, Model 581-V to be exact. It is in really good shape inside and out, mainly because the fellow I bought it from used it as a storage unit/advertisement for his business, which is water brooms for sweeping out shops.
Here are the goals that Willa and I have for this trailer:
1. Lightweight (able to be easily towed by the Jeep
2. Small (will fit through anything the Jeep will fit through and able to follow in the tracks)
3. Rugged (has to stay in one piece when travelling over washboard and hi clearance roads
4. Solid (no tents) and ready to jump into and grab some lunch or a nap while travelling.
5. Comfortable bed big enough for both of us.
6. Room to stand while you get dressed.
So, here is Phase 1 of the project plan to modify the trailer to meet my goals:
1. Find a suitable trailer - Done
2. Remove the full vinyl wrap
3. Build a suitable bed
4. Install windows
5. Wire for 12 volts to vent fan, lights, and inverter
6. Install a vent fan
7. Install a battery
8. Lift the trailer enough and install 32" Jeep tires
9. Build a cabinet in the V nose to store gear and provide a shelf for a laptop
10. Wire for AC/charging circuit for the lights and TV
For phase 2, I'll be evaluating heating, insulation, and air conditioning. Also, I plan to extend the hitch, so that I can maneuver more without hitting the nose of the trailer. I hope to reinforce the frame while I'm at it, by running a 2" tube from the hitch to the rear end, in case I need a tug to get back out of a bad spot. As it is, it would not be possible, since there is no hooks or hitch on the back of the trailer.
When I saw the trailer had a full wrap, I called my cousin (Bret) to see how hard it would be to remove the wrap. Bret and his wife (Tanya) run a business selling supplies and printers for vinyl signs, and ran a sign shop for several years before that.
Bret said it was a 50/50 deal, because removing a wrap can be horrible, or it can be ok. It all depends on how well the vehicle is painted, how well it is cured, and if the sign company used the correct material when they did the wrap. "After you pull off a small piece, you'll know how hard it is going to be." He said to use plenty of heat, and then use a solvent to remove the remaining adhesive once the vinyl is removed.
So once I brought the trailer home I immediately peeled back a small corner of the vinyl. "Yeahhh!" it came off smoothly and in one piece. I managed to pull off all the wrap on the side door before the sun went down. In order to help make the job go well, I am only going to peel it off when the hot sun is beating down on the trailer. I could use my heat gun, but I figure the sun is hot enough here in St George in September (98 degrees today) that I will be able to get the job done without using the gun. I just have to wait until the sun heats up the surface and then peel away. East side in the morning, front at noon, West side in the afternoon. I will probably pull out the heat gun to do the back doors in the morning while waiting for the sun to heat the East side.
Here are some more shots of the trailer:

Backside, showing barn doors

Driver side
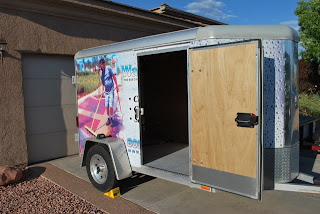
RV Door on curb side

Inside, from the back doors
Stay tuned for the peelin' and grinin' report tomorrow!
No comments:
Post a Comment